Finally I have complete all of the required work for my A level Media Studies advanced portfolio. I really enjoyed researching, planning and creating my music video. All of the processes I followed ensured me that my music video would be up to a good standard. I hope you thoroughly enjoying browsing through my blog and that you have enjoyed my music video.
Alex
Tuesday, 10 May 2016
Hi it’s Alex, I will be discussing my answer for Evaluation question four within this video. The question i have been asked is; How did you use new media technologies in the construction and research, planning and evaluation stages?
For my construction I used a canon EOS 5D, SD Card, Adobe Photoshop, imovie and an iphone 6S. Half of the filming and photos that can be seen associated with my music video and ancillary tasks were filmed or taken with the digital SLR camera. All of the filming footage I took to create the music video was recorded over the course of 9 days. I used the automatic settings for filming on the camera as it made it easier and quicker to film. Due to the camera being of an excellent standard and quality I was able to gain high quality footage quite easily. However, on 3 of my filming days the quality wasn’t as good. This was due to bad wind and rain. The shots weren't as clean cut and clear. I had to edit these scenes as the quality was affected. By doing so I improved the footage quite substantially. Overall, I was very happy with the footage I produced using this camera. It was a very important piece of technology throughout the production of my music video. It gave it a high quality, professional look. Furthermore, the canon takes an SD card. This was a massive benefit as I used it to transfer some of my footage across to the mac, I did this with ease. This was very straight forward and a really vital but important process.
I used the SanDisk 16 GB card to store all my footage on. This was a very safe and convenient way to save and hold my work. I only used one SD card in the construction process as I only filmed half of my footage on the Canon camera.
I used iMovie to cut and edit my music video. This ensured that it was up to a very high standard. I wanted my video to look as professional as possible. It allowed me to add many different filters and effects to my footage. Also, it let me explore different looks and styles of presentation. This was massively beneficial. I was able to use different transitions to improve the standard of my video. In addition to this, I was able to change the speed of my clips. This was really important and successful because it made my emotional clips slower and more powerful to the audience. I learnt a lot from using iMovie like how to use different techniques. This advanced my knowledge and enhanced the level of work that I produced.
I used Photoshop during the creation of my digipak for my artist (Bethany Taylor). I captured four different photographs with my camera (Canon EOS 5D) which I then used on my digipak. This made it look more professional and to a higher quality. This also made me want to emphasise my artist and her look even more. I was able to portray my artist in a way that looked professional and realistic to my target audience. An example of this would be the use of the effect ‘Slumber’ which I used on all my pictures. This gave them a unique style and made them look more professional.
I first learnt how to use photoshop to a high standard is AS. This was when I was constructing my music magazine. In A2 it was much easier to use the site, I was then able to use it quicker and more professionally because of my previous practice. I had more time to experiment with different type of effects and styles. This meant I spent less time on the basic elements of editing photographs. Through learning the basics in AS I was then able to improve my work significantly and improve my work in A2 much faster in comparison to last year.
For research and planning I have used google, blogger, YouTube and survey monkey. I used YouTube to look through existing music videos of my favourite artist Taylor Swift. This was part of my research and in order to successfully understand music videos I needed to use this site. I gained creative, unique ideas and got some valuable inspiration. This was vital to making my music video professional and to a high standard. I looked through many of Taylor’s videos as I wanted to see how the star portrayed herself. I wanted to especially focus of the relationship between the characters and which different shot ranges had been used. In relation to my genre I was interested in how Taylor fed back to her pop genre within these videos. I also wanted to look at how my ideas would relate to her past productions.
I used Blogger during every stage of my production. This made it quite simple and easy to complete posts and post them. I was able to post planning and research quickly and easily when using Blogger. During my research I collected evidence such as different pop music videos I presented and reviewed these on my blog. This helped show change and progress within my research. It helped to construct and plan my ancillary tasks and final music video. When I was in the planning stage, I uploaded all my work to Blogger, this ensured that it could be seen by my teacher. I then gained feedback on ways to change and improve my work. When using a blogging site I knew I was able to work online safely and securely. This allowed me to access my work from wherever I went. Also I was ensured that my work was up to date and easily edited.
When it comes to being able to conduct precise research Google was always there to help. An example of me using google is the research I did on different theorists such as Andrew Goodwin to gain more knowledge on his views and theories. Also I was able to look at the development and views other people had on his theories. I have learnt many things from this such as how to find appropriate things and ways to post new posts on my blog. Furthermore, I ensured that I selectively chose which information and which information to not post. I wanted all of my research to be simple and relevant so it was then easier to read for my audience.
Survey Monkey was used to create an online questionnaire which I could send out via email to my audience which they could then easily complete. This software was a great use of my time. It allowed me to collect data and keep it all in one place instead of sifting through lots of pieces of paper. It also increased the differences between responses, this was because people were able to quickly answer using just their phones. This made it much more easier and convenient.
For the evaluation I used google docs, YouTube, Facebook and Slideshare. I used google docs to easily type up my evaluation questions easily. This was a very easy way to keep all my typed up work in one place. Also I was able to save things very easily. This made it very quick and simple oto access my work when I was out and about.
I used Slideshare to translate my work which I had produced on Microsoft PowerPoint. It gave me an accessible way to upload PowerPoints which I had created on my home computer when I was out and about to the public. It made it much easier to embed my files onto my blog.
Facebook was a great way of gathering audience feedback quickly and effectively. I was able to send all my work out to the public. I made a post and inserted the link of my music video and asked my friends for feedback. It was easier than individually asking people to find the video for themselves. This provided me with quicker responses than if I had waited for people to messge me their views and opinions.
Thursday, 25 February 2016
Wednesday, 24 February 2016
Tuesday, 23 February 2016
Evaluation Question One-
In what way does your media product use, develop or challenge forms and conventions of real media products?
How is the chosen genre represented?
I have chosen the genre pop and I have presented a romance throughout my music video as this is a very common story to tell within a pop music video. As a romantic story, the plot usually ends in a happy ending ( a happily ever after). However, I planned for my storyline to have a happily ever after but have a bad patch in the middle. This is because I wanted it to be more realistic and relationships aren't ever perfect.
Usually, the aim of the storyline is to captivate the audience and entice them to want to watch your music video. The romantic story should contain a climax and a true narrative. For my coursework, I have really pushed myself to achieve the exact romantic storyline that I wanted. I've presented the pop genre in the traditional way and ensured that the love story is there throughout. The flashbacks I have used are highly important as they signify the journey the couple have been through. In our generation most people have a pessimistic approach to relationships. They tend to overthink situations and therefore break down there relationships. I have presented this throughout my music video quite clearly. Often couples find flashbacks the hardest things to deal with. Even if two people have come to terms with their break up they may still suffer from the flashbacks that they live with every day. Therefore I have chosen to use flashbacks so that I am able to connect with my audience. Because most people have been through a relationship and suffered then they can relate too my music video.
Storyline-
The story line for my music video begins with a couple happily in love enjoying life. The lighting is quite cheerful and the narrative is very happy at this stage. In Taylor Swift's music video this is a common story line, the couple being happy and not having any issues. However, as the story line goes on we see the relationship start to unroll. As the relationship gets worse the relationship starts to suffer this is where the cheerful flashbacks start to come in. They show the loving moments where the girl and boy are enjoying their time together round by the lake. There is no dialogue as the music matches the situations shown on the video. When the flashbacks are shown you can see the seasons and holidays that the couple have been on. These are the important flashbacks as it is the couples special memories that should be cherished. To represent the memories and the time that they have been together I have shown the different holidays that the couple have been on. The lighting is brighter in these representing and journey they have been on.
Taylor Swifts music videos usually contain a perfect love story with not many faults. I wanted to challenge this by leaving the end of my music video as an unfinished love story to the audience. This makes the audience a lot more eager to know what happens next. I believe this will make the buyer want to watch more of A&G RECORDS music videos. I believe this is a massive selling point in the pop industry.
Saturday, 20 February 2016
Friday, 22 January 2016
My Plans (Evaluation)
Once I have completed all my filming for my music video and uploaded them to iMovie, I will then need to place them in order and insert the track, I will also have to cut them to fit. My footage is all planned however, I will need to change some clips a little as some of the timings and lip syncing are incorrect. I will have to re-film these clips. This shouldn't take me long but is an inconvineance to my original plans.
Wednesday, 6 January 2016
Editing Techniques
For the production of my music video, I plan on using many different types of editing techniques and transitions to make my video appear more professional. I want to ensure that it is to a high standarad and that it runs as smooth as possible. Below, I have found and selected a few examples of the techniques and transitions that I would like to use, they are as follows-
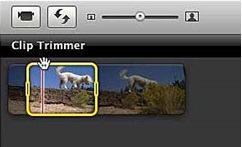
1. Clip cutting-
Cutting the clips is a very basic editing technique that I am going to use when ordering and putting my footage together. Once I put my clips in order, I will cut them using the clip trimmer to erase any unwanted footage or to make my clips longer or shorter to make the correct timings. Cutting the clips are a smooth and quick way to jump from one clip to another.

2. Fade out
Another transition effect is fade out. It is a good transition affect to use, I plan on using this in the making of my music video. My plan is on using the fade from black transition right at the beginning of my music video to make it look more professional and so that my video has more of an introduction and doesn't just come straight in with the music. This will make it appear more smooth and realistic.

3. Flash backs
My plan is to use the flash back effect within the production of my music video. This will stand side by side with fade outs. I feel that these two effects will compliment each other massively. For this I will show my clips fading into a memory. For example I will show a current time clip and then flash back to old flash backs. This will give the effect that my artist looking back on the past is trying to create.

4. Transition effects-
'Cross Dissolve'
I plan to use cross dissolving in the process of producing my music video. I will use this between some of my clips. The effect uses it's technique to layer two different clips together. This is so the change between clips is much flower and there is more of a fade between them. This then allows one of the clips to fade out so the new one can then go on and start. Furthermore, this gives more of a smooth and proffessional transition. Some of my music videos contain flashbacks into the past. This transition effect will give my audience an idea that time is passing and that it is a flashback. I also hope to use this transition effectively and not over use it within my music video as I don't want my audience to get bored and find my artist mainstream.

1. Clip cutting-
Cutting the clips is a very basic editing technique that I am going to use when ordering and putting my footage together. Once I put my clips in order, I will cut them using the clip trimmer to erase any unwanted footage or to make my clips longer or shorter to make the correct timings. Cutting the clips are a smooth and quick way to jump from one clip to another.
2. Fade out
Another transition effect is fade out. It is a good transition affect to use, I plan on using this in the making of my music video. My plan is on using the fade from black transition right at the beginning of my music video to make it look more professional and so that my video has more of an introduction and doesn't just come straight in with the music. This will make it appear more smooth and realistic.
3. Flash backs
My plan is to use the flash back effect within the production of my music video. This will stand side by side with fade outs. I feel that these two effects will compliment each other massively. For this I will show my clips fading into a memory. For example I will show a current time clip and then flash back to old flash backs. This will give the effect that my artist looking back on the past is trying to create.

4. Transition effects-
'Cross Dissolve'
I plan to use cross dissolving in the process of producing my music video. I will use this between some of my clips. The effect uses it's technique to layer two different clips together. This is so the change between clips is much flower and there is more of a fade between them. This then allows one of the clips to fade out so the new one can then go on and start. Furthermore, this gives more of a smooth and proffessional transition. Some of my music videos contain flashbacks into the past. This transition effect will give my audience an idea that time is passing and that it is a flashback. I also hope to use this transition effectively and not over use it within my music video as I don't want my audience to get bored and find my artist mainstream.

Tuesday, 5 January 2016
Timeline
Here I have produced a timeline. This shows my plans and ideas for the production, planning and post production of my music video. I have done this so that I can have a rough idea of timings and so that I have a guide to follow to get everything completed by a certain date. I hope to be fully completed by March 10th.
January 1st-14th January 15th-20th January 21st-31st February 1st-14th February 15th-27th March 1st-10th
Planning
Production PostProduction
Call sheets, Shoot schedules, story boards, costumes and prop lists Filming Editing Finishing of coursework and finishing my evaluation
January 1st-14th January 15th-20th January 21st-31st February 1st-14th February 15th-27th March 1st-10th
Planning
Production PostProduction
Call sheets, Shoot schedules, story boards, costumes and prop lists Filming Editing Finishing of coursework and finishing my evaluation
Monday, 4 January 2016
Shoot Schedule
Here is my shoot schedule. It contains all the dates and locations needed to film the shots so that they can be filmed in an organised manor and so I can move on to my next location and scene easily without a fuss.
Date&Time Frame Section Actors Involved Equipment&Props Location Interference's
Jan 28th 2016 Scene setting shot/ No actors involved Canon 600D Hedley Low/No sun
12.40pm Establishing shot (scenic shot only) Outdoor setting
Jan 30th 2016 Lip Syncing, Close Actor 1 (Beth) Canon 600D Headley No sun, raining
15.30pm Ups, High angle, Actor 2 (William) Tripod Outdoor setting
Long shots & Track Sunglasses
-ing shots
Feb 7th 2016 Lip syncing Actor 1 (Beth) Canon 600D Box Hill No sun, raining
13.30pm Mid Shot Tripod Outdoor setting
Feb 15th 2016 Mid shot/Low shot Actor 3 (Harry) GoPro Marbella Hot Sun & mid
13.45pm Actor 4 (Myself) IPhone 6S Puerto Banus Sun
Actor 5 (Alfie)
Feb 18th 2016 High shot/Wide shot Actor 3 (Harry) IPhone 6S Sierra Nevada Warm winter sun
15.00pm Actor 4 (Myself)
Saturday, 2 January 2016
Call Sheet
Below is a sample of my call sheet. On the call sheet below it explains all the important details about my music video shoot and the full information. I have included things such as equipment needed, actors, costumes, props, times, dates and the weather on that day.
Production name; Into the Woods-Taylor Swift (cover)
Director; Alex
Producer; Alex
Camera work; Alex, Alfie and Bethany
Location; Headley and Mulberries Lake
Date; January 7th 2016 and January 10th 2016
Start Time; 10am and 12pm
End Time; 3.30 pm and 4pm
Actor's, Costume's and Prop's-
Bethany- Green Dress, grey coat. Small LED lights (setting).
William- Black jeans, white t-shirt and brown coat. Small LED lights (setting).
Harry- Swimming shorts and ski clothing.
Alfie- Swimming shorts.
Myself- bikini and ski clothing.
Equipment- GoPro, Canon600DDSL Camera and Tripod.
Weather- Sun, blue sky's and slightly cloudy.
Subscribe to:
Comments (Atom)